Working With Liquid Templates
In advanced workflows, you can use Liquid templates to transform data from one format to another. This typically is needed in these cases:
-
Third party Integrations
 Shared Access Signature. A secure way to grant limited access to Azure storage resources without sharing storage account keys. A SAS token contains permissions and an expiration time. using the HTTP node Individual components that make up a runbook automation, each performing a specific function such as data queries, transformations, logic, integrations, or visualizations. connected to a Transform node
 -
Saving variables using the Set Variables node
You can also use the Transform node with many of the other nodes in the Runbook![]() An automated workflow that executes a series of steps or tasks in response to a triggered event, such as the detection of anomalous behavior generating an incident, a lifecycle event, or a manually executed runbook. Node palette to transform their data into another format using a Liquid template.
An automated workflow that executes a series of steps or tasks in response to a triggered event, such as the detection of anomalous behavior generating an incident, a lifecycle event, or a manually executed runbook. Node palette to transform their data into another format using a Liquid template.
If you want more information about Liquid, or how Liquid templates work, see the Liquid template language page for complete documentation.
Template Variables
The Liquid template allows you to access variables that are passed in to the template from the Trigger![]() A set of one or more indicators that have been correlated based on certain relationships, such as time, metric type, application affected, location, or network device. node or the direct parent nodes of the Transform or Set Variable nodes. The variables are surrounded by double curly braces as follows:
A set of one or more indicators that have been correlated based on certain relationships, such as time, metric type, application affected, location, or network device. node or the direct parent nodes of the Transform or Set Variable nodes. The variables are surrounded by double curly braces as follows:
{{trigger["network_interfaces"]}}
In the variable, the trigger key specifies to get the data from the trigger, while the network_interfaces key specifies to get the network_interfaces object within the trigger. There are three root keys for all the variables. They are:
-
trigger: Get data from the Trigger node.
-
node_input.output: Get data from the parent node's output
A document containing data sets generated by the execution of a runbook, including output of queries and reports from point products, as well as output of analysis or other runbook nodes.. -
variables: Get data from a runtime or incident
A collection of one or more related triggers. Relationships that cause triggers to be combined into incidents include application, location, operating system, or a trigger by itself. variable within the Runbook.
The trigger has multiple objects in it, so, when you are pulling data from the trigger, you need to specify which object within the trigger you want to access. This is done by enclosing the object key in quotes and then in brackets. So, to get to the network_interface object, you use the following format for the variable:
{{trigger["network_interfaces"]}}
The following objects are available in the trigger:
-
network_interfaces
-
network_devices
-
application_locations
-
status_changed
-
ongoing_state_changed
-
runbook_completed
-
note_added
-
note_updated
-
indicators_updated
After you have specified the object you want to get the data from, it is useful to know the standard format that the data is in. A device, for example, has the following format:
{
  "data": [
    {
      "data": {
        "throughput": "25.4"
      },
      "keys": {
        "network_device.ipaddr": "10.5.45.64",
        "network_device.name": "Device 1",
        "network_device.location.name": "DC_West",
        "network_device.serial_number": "NF2PX0000394E",
        "network_device.os_version": "RiOS 9.12.2 (x86_64)",
        "network_device.model": "Riverbed SteelHead CXA580B110",
        "network_device.type": "WAN Accelerator",
        "network_device.vendor": "Riverbed Technology",
        "network_device.is_gateway": false,
        "is_primary_indicator": true
      }
    },
    {
      "data": {
        "throughput": "10.4"
      },
      "keys": {
        "network_device.ipaddr": "10.5.22.52",
        "network_device.name": "Device 2",
        "network_device.location.name": "Branch_East",
        "network_device.serial_number": "NF2MM000039A3",
        "network_device.os_version": "RiOS 9.12.2 (x86_64)",
        "network_device.model": "Riverbed SteelHead CXA580B110",
        "network_device.type": "WAN Accelerator",
        "network_device.vendor": "Riverbed Technology",
        "network_device.is_gateway": false,
        "is_primary_indicator": false
      }
    }
  ]
}
So, if you want to get to the key network_device.name in the first element of the data array, you would use the following:
{{trigger["network_devices"]["data"][0].keys["network_device.name"]}}In the example above, this would result in the value "Device 1". If you want to get data from the second item in the array, just modify the array index as follows:
{{trigger["network_devices"]["data"][1].keys["network_device.name"]}}This will return "Device 2". You can access metric values with the following:
-
Enable debugging.
-
Run the Runbook.
-
Look at the debug data in the trigger, for example:
-
Copy
{

    "runtime.metricValue": "{{trigger["network_devices"]["data"][0].data["device_status"]["actual_value"]}}"

} -
Note: This debug data is not accessible from the UI.
-
Now, if you want to access the interface data from the output of the previous node, use the node_input.output key and you have the following. If we use the network_device from the preceding example:
{{node_input.output["data"][0].keys["network_device.name"]}}The node_input.output key does allow you to access the metric data, and that has the format:
{{node_input.output["data"][0].data["throughput"]}}Finally, to access any of the runtime variables within the template, use the variables key as follows:
{{variables["incident.demoTOI"]}}When accessing the trigger information from a Webhook trigger, the format of the information passed in by the Webhook is slightly different, and the following objects are available:
-
requestBody
-
requestQueryParameters
-
requestHeaders
-
requestPath
Here are examples of each for the Webhook trigger:
-
{{trigger["requestBody"]["application"]}} -
{{trigger["requestQueryParameters"]["application"]}} -
{{trigger["requestHeaders"]["Accept-Encoding"][1]}} -
{{trigger["requestPath"]}}
Liquid Template Editor
The Template Editor helps you define a Liquid template.
The tool bar above the text panel helps you generate the variable token in the text, so you do not have to format the variable yourself. You can use the tool bar to generate the variable, and then you can edit it to do exactly what you want. The following screenshot shows the template editor with the toolbar above the text panel and the error information below that.
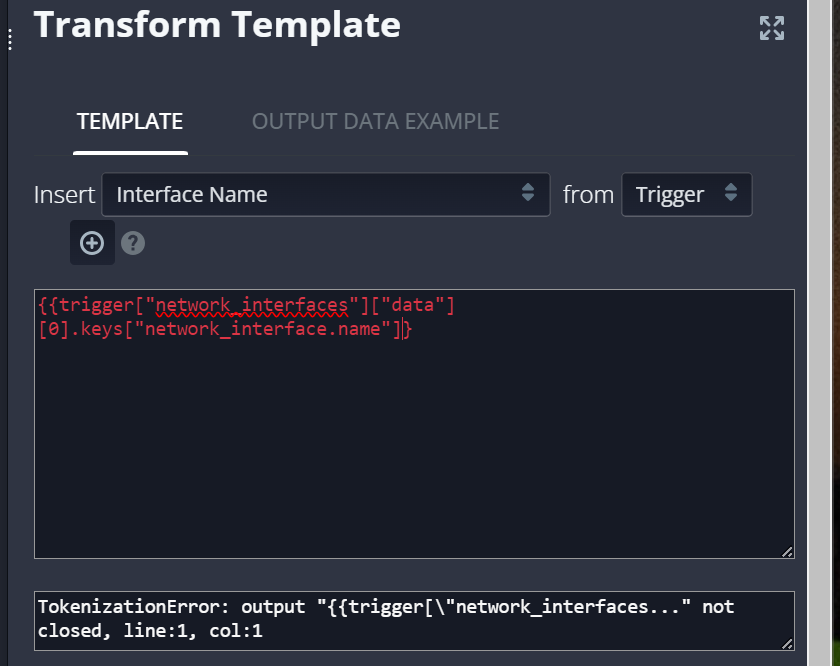
The editor has three components:
-
Tool bar: The tool bar configures which variable you want to add, and, after making the appropriate selections in the tool bar, you can click the + (Add) button to add the variable in the template at the position of the cursor.
-
Text content area: This is directly below the tool bar, and is where you type the Liquid template content. When you click the + button in the tool bar, variables are added in the content area at the position of the cursor.
-
Error information: This is directly below the text content area, and shows error information including the line and position of the error in the Liquid template. This area will be empty when there are no errors.
The editor is simple, and the only part that needs explanation is the tool bar. The combo box after the From label allows you to select the top level key as described above. It has three choices that correspond to the three top level keys:
-
Trigger: This will generate a variable that gets data from the trigger and inserts the trigger key in the variable. When you switch to Trigger in the combo box, it will update all the items in the combo box to the right of the Insert label with the trigger entities that can be used in the Liquid variable.
-
Parent: This will generate a variable that gets data from the parent node and uses the node_input.output key. When you switch to Parent in the combo box, it will update all the items in the combo box to the right of the Insert label with the parent node entities that can be used in the Liquid variable.
-
Variable: This will generate a variable that gets data from the runtime or incident variables used in the Runbook, and generates a variable with the top level variables key. When you switch to Variable in the combo box, it will update all the items in the combo box to the right of the Insert label with the list of runtime and/or incident variables that can be used in the Liquid variable.
After selecting the data type in the combo box and the item to insert, place your cursor in the text area and click the plus icon to insert the Liquid variable at that location.
When editing Subflows![]() A reusable automation chunk that performs frequently used functions, such as opening a ticket in an external system, and can be used to implement integrations with third-party systems., you do not have access to the Trigger, so the Trigger information will not be visible in the editor in this case.
A reusable automation chunk that performs frequently used functions, such as opening a ticket in an external system, and can be used to implement integrations with third-party systems., you do not have access to the Trigger, so the Trigger information will not be visible in the editor in this case.
Liquid Basics
This section is intended give you a few basic tips to get started, not to document the complete Liquid language. For that, see the Liquid template language page.
The first concept to understand is assignment; in Liquid, you can assign one variable to another. So, if you do not want to keep typing the text, "node_input.output.data[0].keys.application", then you can assign it to a variable. Use the "{%" delimiter to assign variables and make conditional statements.
Here is an example of assigning a variable:
{% assign appName = node_input.output.data[0].keys.application %}In this case, you have assigned "node_input.output.data[0].keys.application" to the variable "appName".
You can use the same delimiter for conditional statements. For example, to emit different variables based on a condition:
{% if variable["runtime.MyIntVar"] == 1 %}
    {{variable["runtime.MyString"]}}
{% elseif appName == "NFS" %}
    {{variable["runtime.MyOtherString"]}}
{% else %}
    {{variable["runtime.MyOtherString2"]}}
{% endif %}
Tips
-
To discover the format of the data coming out of a node so you can decide on the format of the Liquid variable, turn on the Debug flag in the Node Properties, then open the Debug dialog to see the format of the objects coming out of that node.
-
Another way to see the format of data from the various nodes is to open the Editor and look at the Advanced section, which will contain an example of the data coming out of the node.