Integrations Library Page
Riverbed IQ Ops' Integrations Library furnishes numerous turn-key integrations![]() Shared Access Signature. A secure way to grant limited access to Azure storage resources without sharing storage account keys. A SAS token contains permissions and an expiration time., ready to be installed and configured, that enable you to integrate Riverbed IQ Ops with third-party vendors such as ServiceNow and Microsoft Azure, among many others. These integrations increase the power and ease of use of IQ Ops' third-party application
Shared Access Signature. A secure way to grant limited access to Azure storage resources without sharing storage account keys. A SAS token contains permissions and an expiration time., ready to be installed and configured, that enable you to integrate Riverbed IQ Ops with third-party vendors such as ServiceNow and Microsoft Azure, among many others. These integrations increase the power and ease of use of IQ Ops' third-party application![]() An entity type representing software applications deployed in the customer environment that are monitored for performance and anomalies. support through integration-specific subflows
An entity type representing software applications deployed in the customer environment that are monitored for performance and anomalies. support through integration-specific subflows![]() A reusable automation chunk that performs frequently used functions, such as opening a ticket in an external system, and can be used to implement integrations with third-party systems. that can be used in runbooks
A reusable automation chunk that performs frequently used functions, such as opening a ticket in an external system, and can be used to implement integrations with third-party systems. that can be used in runbooks![]() An automated workflow that executes a series of steps or tasks in response to a triggered event, such as the detection of anomalous behavior generating an incident, a lifecycle event, or a manually executed runbook. after an integration is installed.
An automated workflow that executes a series of steps or tasks in response to a triggered event, such as the detection of anomalous behavior generating an incident, a lifecycle event, or a manually executed runbook. after an integration is installed.
Navigate to the Integrations Library:
- Click the Launchpad button ⁝⁝⁝.
- Click IQ Ops > Integrations.
The page has two tabs, one showing cards for Installed integrations, the other showing cards for Available (uninstalled) integrations. Once installed, an integration's card moves from the Available tab to the Installed tab.
Integration cards
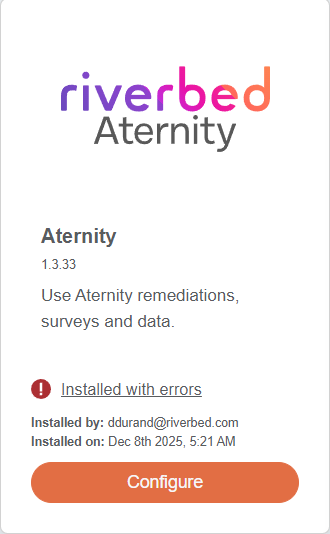
Installed integrations contain the following information on integration cards:
-
Name.
-
Version.
-
Description.
-
(Conditional) A warning describing if there were errors during installation. This warning only appears when the installation has errors.
-
Who the integration was installed by.
-
When the integration was installed.
Integration dialog tabs
When you click Install on an integration card (Available tab) or Configure (Installed tab), a dialog opens with three tabs: Description, Content, and Configuration. The Description tab summarizes the integration support and provides links to the third party's own information about its product. The Configuration tab provides access to connectors and, when installing, the Add a Connector button. The Content tab displays what is contained in the integration.
Content tab
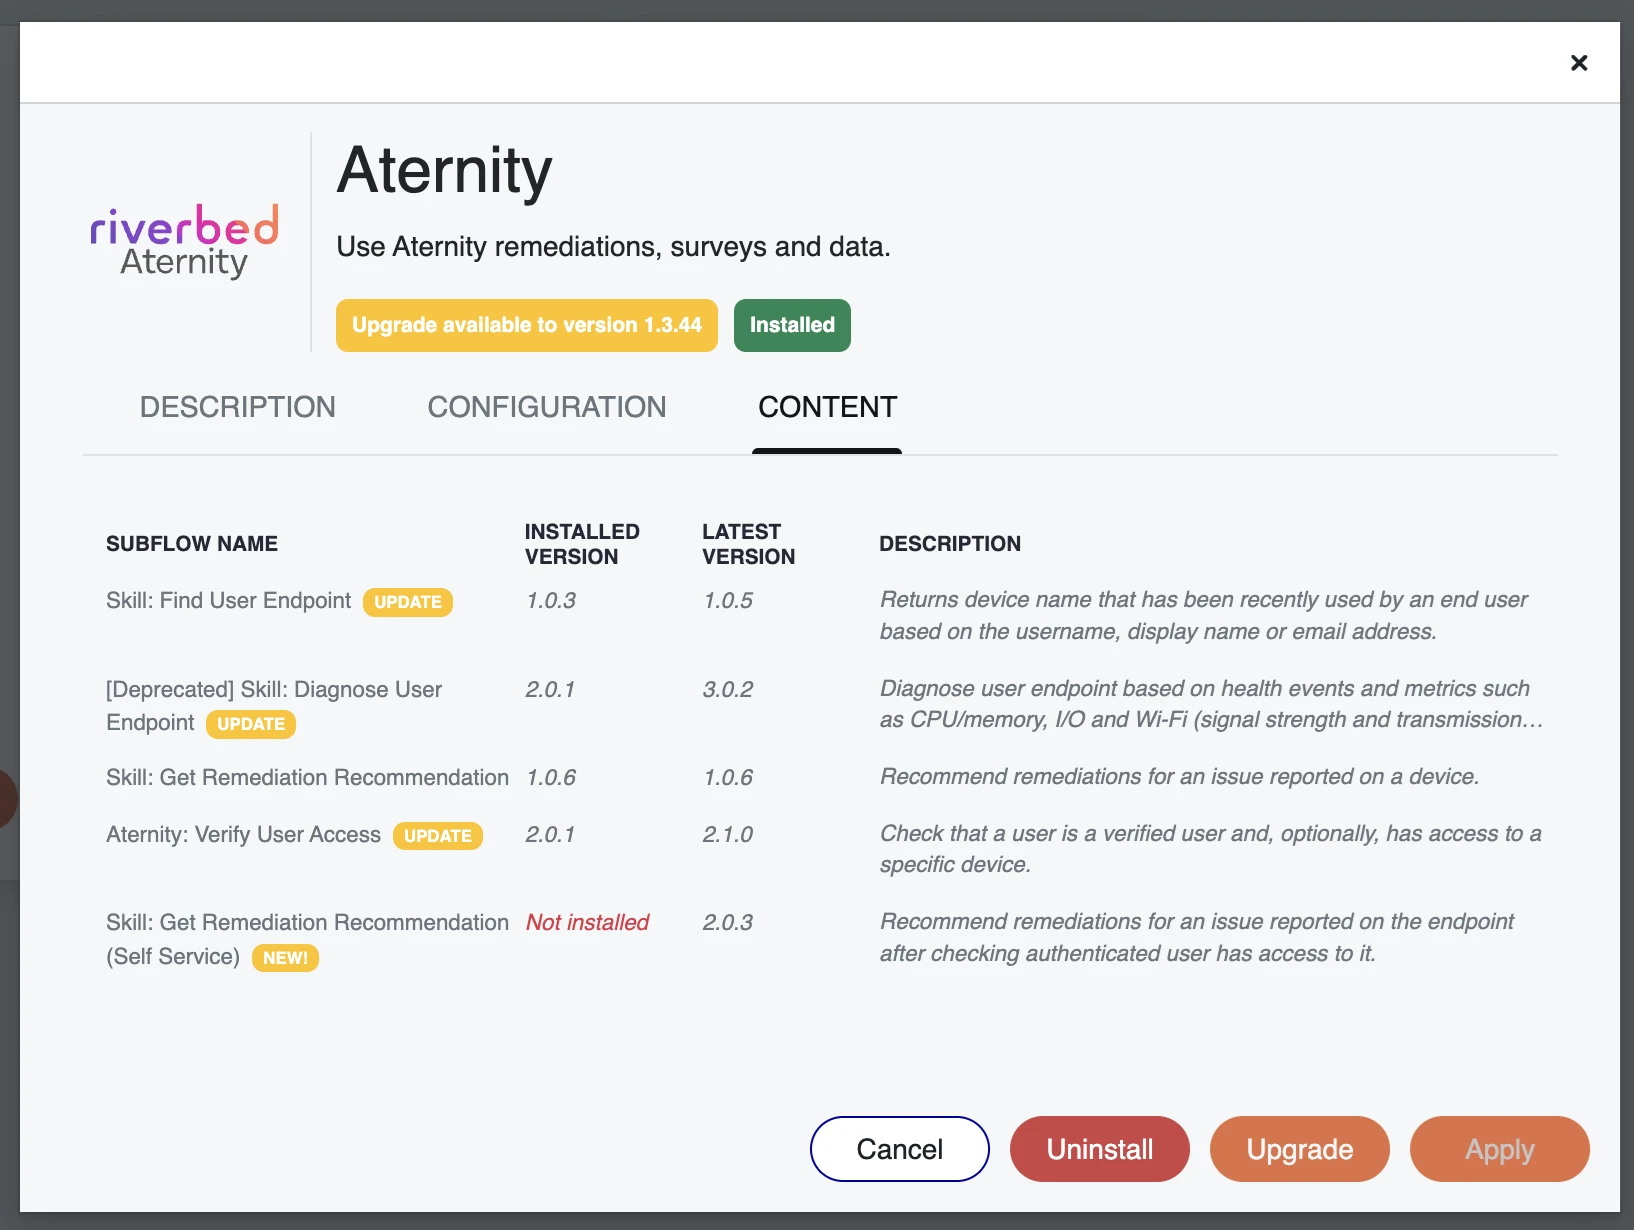
For installed integrations, the Content tab lists the integration's subflows![]() A reusable automation chunk that performs frequently used functions, such as opening a ticket in an external system, and can be used to implement integrations with third-party systems. with name and description (and runbooks when supported). It shows the installed version and the version available in the latest update. The list also includes subflows that are not installed but are available in the latest update. Two badges can appear next to a subflow name:
A reusable automation chunk that performs frequently used functions, such as opening a ticket in an external system, and can be used to implement integrations with third-party systems. with name and description (and runbooks when supported). It shows the installed version and the version available in the latest update. The list also includes subflows that are not installed but are available in the latest update. Two badges can appear next to a subflow name:
-
UPDATE: The subflow is installed but is not the latest version.
-
NEW!: The subflow is not installed. This badge applies when the integration is not installed or when the subflow was added in the most recent integration update.
For available (uninstalled) integrations, the Content tab shows only the latest version available, with name and description for each subflow. The installed version is not displayed.
Installing an integration
You install an integration from the Available tab by opening the Installation dialog, adding at least one connector, and completing the installation. For step-by-step instructions, see Installing an Integration.
Modifying an integration after installation
After an integration is installed, you can open the integration dialog from the Installed tab to uninstall the integration or manage its connectors. For details, see Modifying an Integration After Installation.
Upgrading an integration
When a newer version of an integration you have installed is available, an Upgrade Available tag appears on the integration's card in the Installed tab. For the full upgrade procedure and information about subflow versioning, see Upgrading an Integration.