Application and Location Mapping
Riverbed IQ Ops analyzes data from several Riverbed products and generates incidents![]() A collection of one or more related triggers. Relationships that cause triggers to be combined into incidents include application, location, operating system, or a trigger by itself.. Sometimes the applications
A collection of one or more related triggers. Relationships that cause triggers to be combined into incidents include application, location, operating system, or a trigger by itself.. Sometimes the applications![]() An entity type representing software applications deployed in the customer environment that are monitored for performance and anomalies.
and locations
An entity type representing software applications deployed in the customer environment that are monitored for performance and anomalies.
and locations![]() An entity type representing physical or logical locations in the customer environment where entities are deployed and monitored. have slightly different names on the Riverbed data sources
An entity type representing physical or logical locations in the customer environment where entities are deployed and monitored. have slightly different names on the Riverbed data sources![]() A product in your network that forwards data to the system. This data can be streaming data used to detect anomalies and generate incidents, or data that can be fetched on demand when runbooks are executed.. Additionally, several of the data sources allow users to define applications
and they can provide any name desired. The application and location mapping feature allows you to merge applications and locations into a group. The system will choose the name of one of the applications or locations that was merged into the group, based on internal rules, and that name will be used whenever the merged application or location appears in the UI
A product in your network that forwards data to the system. This data can be streaming data used to detect anomalies and generate incidents, or data that can be fetched on demand when runbooks are executed.. Additionally, several of the data sources allow users to define applications
and they can provide any name desired. The application and location mapping feature allows you to merge applications and locations into a group. The system will choose the name of one of the applications or locations that was merged into the group, based on internal rules, and that name will be used whenever the merged application or location appears in the UI![]() User Interface. The visual components and controls that users interact with to access features and manage the system.. All applications and locations in that group generate incidents using the common name for the group. Additionally, the custom properties for the merged item are set based on the individual members.
User Interface. The visual components and controls that users interact with to access features and manage the system.. All applications and locations in that group generate incidents using the common name for the group. Additionally, the custom properties for the merged item are set based on the individual members.
Merging Applications
Sometimes Riverbed products use a slightly different name for what is essentially the same application. To make the applications display a common name when an incident is generated, you can go to the Applications Explorer and merge the applications into one definition.
-
-
Navigate to the Applications Explorer Page:
-
Click the Launchpad button ⁝⁝⁝.
-
Click IQ Ops > Management.
-
In the Management page, click the Hamburger Icon, then click Explorer - Applications.
-
-
-
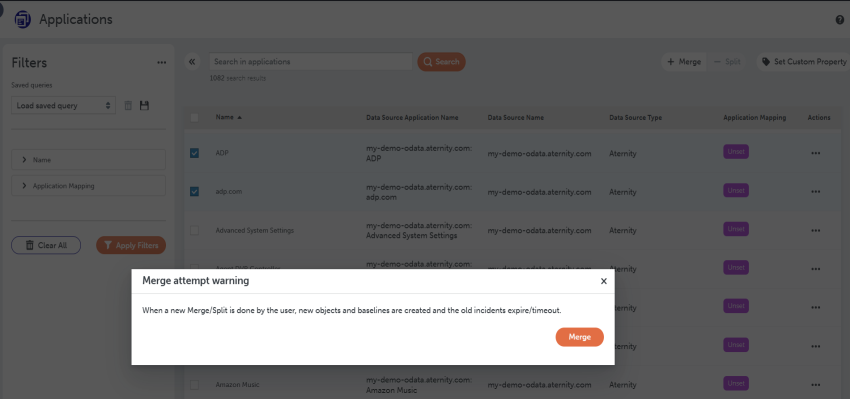
Select the set of applications that you want to group together.
-
Then, click on the Merge button.
-
Note: The UI will warn you that merging applications will cause the baselines to reset and the old incidents to expire/timeout.
-
Click Merge to submit the changes.
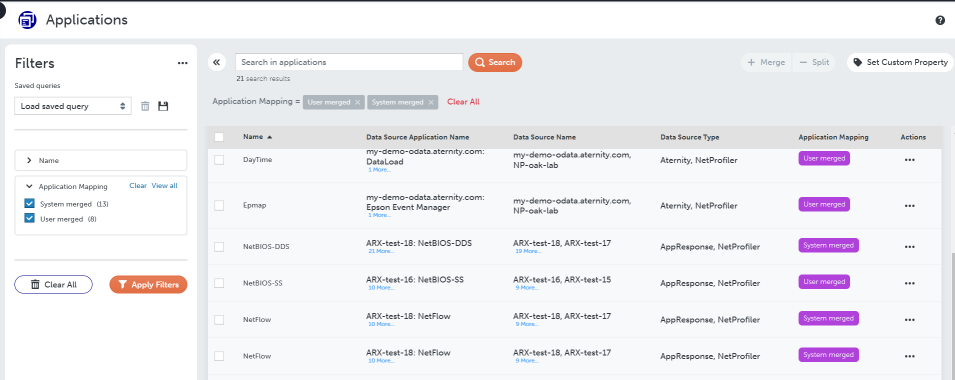
When you merge an application you can see which application names have been grouped together by looking at the Data Source Application Name column, which includes all the Riverbed data sources that have been grouped into that application definition.
To split a grouped application, select the application in the list and click the Split button. Both User merged and System merged application definitions can be split. The UI will warn you that splitting applications will cause the baselines to reset and the old incidents to expire/timeout. If this is acceptable, Click Split to submit the changes.

To see which applications have been grouped, use the Applications Explorer to search for all applications that have the Application Mapping custom property set to User merged or System merged.
To run this search:
-
-
Navigate to the Applications Explorer Page:
-
Click the Launchpad button ⁝⁝⁝.
-
Click IQ Ops > Management.
-
In the Management page, click the Hamburger Icon, then click Explorer - Applications.
-
-
-
If the Application Mapping filter does not show up in the Filters section:
-
Go to the ... at the top of the filters section.
-
Select Customize List.
-
Add the Application Mapping filter to the list of filters.
-
-
After the Application Mapping filter is visible expand it.
-
Select System Merged and User merged values.
-
Click Apply Filters. This looks as follows:
Whenever you see applications with different names in an incident that are the same application, follow the procedure above to set merge the applications into a common definition. At any time if you change your mind and want to split the merged application, follow the split procedure described above.
Merging Locations
Sometimes Riverbed products use slightly different names for what is essentially the same location. To make the locations display a common name when an incident is generated, you can go to the Locations Explorer and merge the locations into one definition.
-
-
Navigate to the Explorer Locations Page:
-
Click the Launchpad button ⁝⁝⁝.
-
Click IQ Ops > Management.
-
In the Management page, click the Hamburger Icon, then click Explorer - Locations.
-
-
-
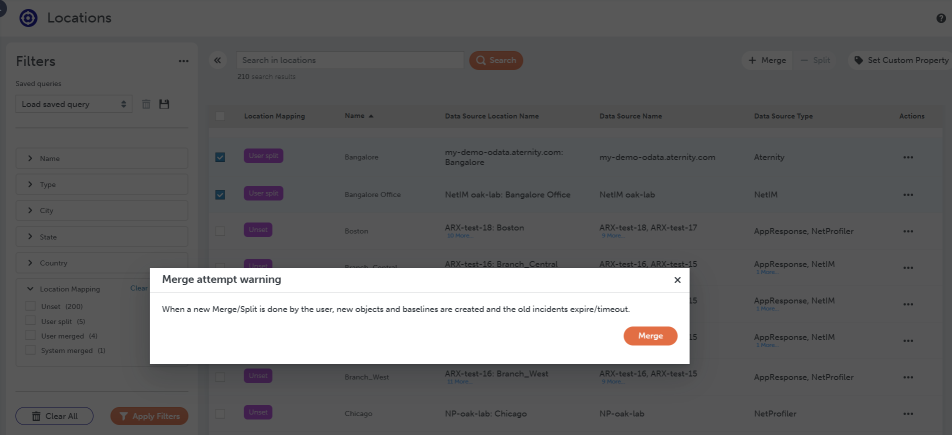
Select the set of locations that you want to group together and click on the Merge button.
-
Note: The UI will warn you that merging locations will cause the baselines to reset and the old incidents to expire/timeout.
-
Click Merge to submit the changes.
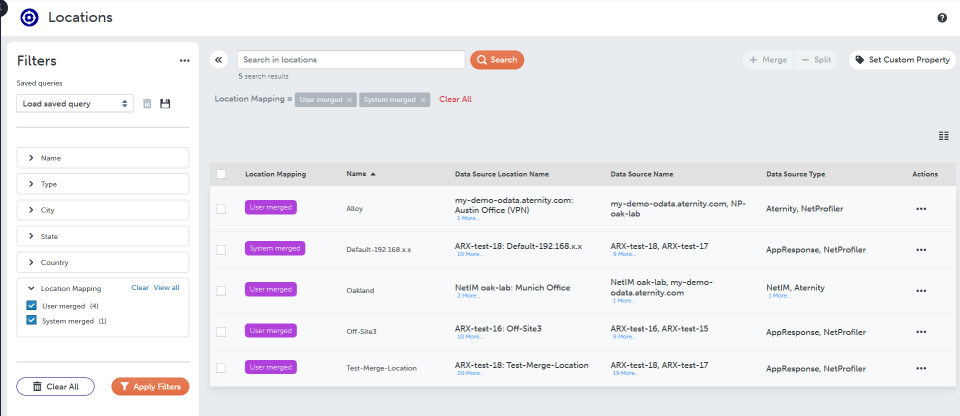
When you Merge a location you can see which location names have been grouped together by looking at the Data Source Location Name column, which includes all the Riverbed data sources that have been grouped into that location definition.
To split a grouped location, select the location in the list and click the Split button. Both User merged and System merged location definitions can be split. The UI will warn you that splitting locations will cause the baselines to reset and the old incidents to expire/timeout. If this is acceptable, Click Split to submit the changes.

To see which locations have been grouped, use the Locations Explorer to search for all locations that have the Location Mapping custom property set to User merged or System merged.
To run this search:
-
-
Navigate to the Explorer Locations Page:
-
Click the Launchpad button ⁝⁝⁝.
-
Click IQ Ops > Management.
-
In the Management page, click the Hamburger Icon, then click Explorer - Locations.
-
-
-
If the Location Mapping filter does not show up in the Filters section, go to the ... at the top of the filters section
-
Select Customize List.
-
Add the Location Mapping filter to the list of filters.
-
After the Location Mapping filter is visible, expand it and select the System Merged and "User merged values and click Apply Filters. This looks as follows:
Whenever you see locations with different names in an incident that are the same location, follow the procedure above to set merge the locations into a common definition. If you want to split the merged location, follow the split procedure described above.